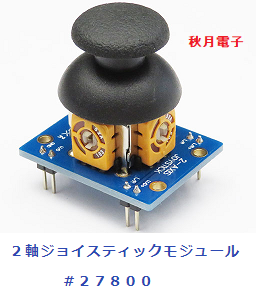
例題に間違いありで苦労したが一応行けた。ジョイスティックをマウス代わりは違う。他に使うなら色々使えそうだ。
スムーズに斜め線をペイントで引こうと思うと中々難しい。水平と垂直は移動は遅い。斜めだと早い。ベクトル合成されるからか。この辺も調整できるようになりたいね。
注)5ピンでマウスを殺せるようにしておくこと。そして他のハードで再度違うプログラム書き込みたいならそのハードにも5ピンを入力スイッチとしておくこと。でないと書き込むときにマウスの機能の入力そのままなのでマウスが移動状態になり、PC側のマウスが思ったところに持って行けずマウスでスケッチのツールバーを指し示すことが出来ず書き込めなくなる。

#include "Mouse.h"
// set pin numbers for switch, joystick axes, and LED:
const int switchPin = 5; // switch to turn on and off mouse control
const int mouseButton = 7; // input pin for the mouse pushButton
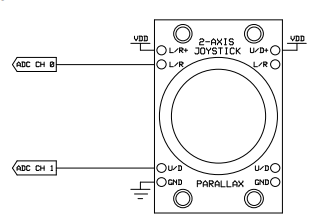
const int xAxis = A0; // joystick X axis
const int yAxis = A1; // joystick Y axis
const int ledPin = 2; // Mouse control LED
// parameters for reading the joystick:
int range = 4; // output range of X or Y movement
int responseDelay = 5; // response delay of the mouse, in ms
int threshold = range / 4; // resting threshold
int center = range / 2; // resting position value
boolean mouseIsActive = false; // whether or not to control the mouse
int lastSwitchState = LOW; // previous switch state
void setup() {
pinMode(switchPin, INPUT); // the switch pin
pinMode(ledPin, OUTPUT); // the LED pin
// take control of the mouse:
Mouse.begin();
}
void loop() {
// read the switch:
int switchState = digitalRead(switchPin);
// if it's changed and it's high, toggle the mouse state:
if (switchState != lastSwitchState)
{
if (switchState == HIGH)
{
mouseIsActive = !mouseIsActive;
// turn on LED to indicate mouse state:
digitalWrite(ledPin, mouseIsActive);
}
}
// save switch state for next comparison:
lastSwitchState = switchState;
// read and scale the two axes:
int xReading = readAxis(xAxis);
int yReading = readAxis(yAxis);
// if the mouse control state is active, move the mouse:
if (mouseIsActive) {
Mouse.move(xReading, -yReading, 0);
}
if (digitalRead(mouseButton) == LOW)
{
// if the mouse is not pressed, press it:
if (!Mouse.isPressed(MOUSE_LEFT))
{
Mouse.press(MOUSE_LEFT);
}
}
// else the mouse button is not pressed:
else
{
// if the mouse is pressed, release it:
if (Mouse.isPressed(MOUSE_LEFT))
{
Mouse.release(MOUSE_LEFT);
}
}
delay(responseDelay);
}
/*
reads an axis (0 or 1 for x or y) and scales the
analog input range to a range from 0 to <range>
*/
int readAxis(int thisAxis)
{
// read the analog input:
int reading = analogRead(thisAxis);
// map the reading from the analog input range to the output range:
reading = map(reading, 0, 1023, 0, range);
// if the output reading is outside from the
// rest position threshold, use it:
int distance = reading - center;
if (abs(distance) < threshold) {
distance = 0;
}
// return the distance for this axis:
return distance;
}
まだ試してないがmap関数を使ってやってみるとマウスポインターの移動が自然になるかな
#include "Mouse.h"
const int xAxis = A1;         // X軸用アナログセンサ
const int yAxis = A2;         // Y軸用アナログセンサ
int range = 12;               // X/Yの移動の出力範囲
int responseDelay = 2;       // マウスの反応の遅延。単位はミリ秒
int threshold = range/4;      // 静止状態を表す閾値
int center = range/2;         // 出力幅の中心
int minima[] = {
  1023, 1023};                // 実際のanalogRead()の最小値(X軸、Y軸)
int maxima[] = {
  0,0};                       // 実際のanalogRead()の最小値(X軸、Y軸)
int axis[] = {
  xAxis, yAxis};              // X軸・Y軸を制御するためのアナログピン番号
int mouseReading[2];          // 最後のマウスの読み取り値

void setup() {
 Mouse.begin();
}

void loop() {

// 2つの軸の値を読み取り縮小する
  int xReading = readAxis(0);
  int yReading = readAxis(1);

// マウスを動かす
    Mouse.move(xReading, yReading, 0);
    delay(responseDelay);
}
/*
  軸(0のときはX軸、1のときはY軸)を読み取り、
 アナログ入力値を 0 から rangeの範囲に縮小する
*/
int readAxis(int axisNumber) {
  int distance = 0;    // 出力幅の中心からの距離

  // アナログ入力を読み取る
  int reading = analogRead(axis[axisNumber]);

// 軸の最大値・最小値を超えたときは、最大値・最小値を変更する
  if (reading < minima[axisNumber]) {
    minima[axisNumber] = reading;
  }
  if (reading > maxima[axisNumber]) {
    maxima[axisNumber] = reading;
  }

  // アナログ入力値を出力幅に変換する
  reading = map(reading, minima[axisNumber], maxima[axisNumber], 0, range);

 // 出力値がスレッショルドよりも大きければその値を使う
  if (abs(reading - center) > threshold) {
    distance = (reading - center);
  }

  // Y軸は正負を逆転させる必要がある
  if (axisNumber == 1) {
    distance = -distance;
  }

  // 軸の移動距離を返す
  return distance;
}
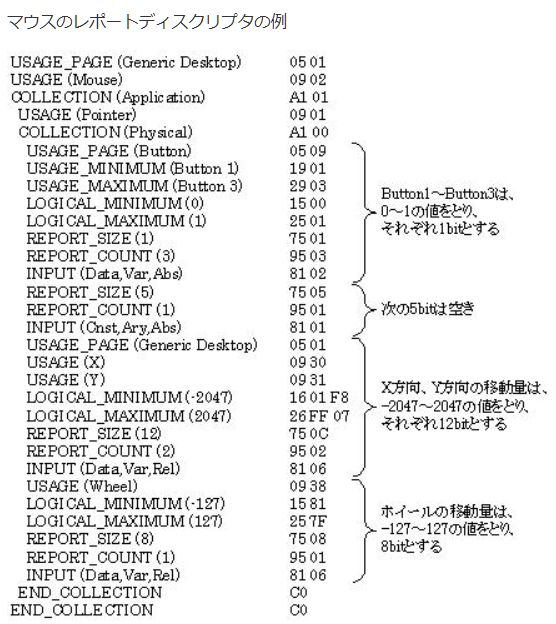
●ここは関係ないけどUSBでマウスを扱う場合の定義